The vernier caliper is used in length measurements to gain an additional
digit or more of accuracy compared to a simple ruler. And more than
just replacing rulers, they allow for accurate linear measurements
(within the rated limits of the devise) of distances that would be difficult or impossible to get with a hand held ruler.
You can see from the image at the link below that vernier calipers
typically have what look like one or two pairs of prongs. One pair could
be adjusted to measure for example the outer diameter of tube-like
objects or outer lengths of any number of different objects. You would
open the prongs and carefully close them until they just touch the outer
edges of such an object, giving a reading of the diameter or length.
The other pair of prongs could be brought in tightly and then carefully
expanded until they extend to a length of some inner space the
dimensions of which you need to know.
Vernier calipers work like slide caliper.
Vernier calipers are used for more accurate measuring than can be achieved with a measuring rule or a slide caliper. It is capable of measuring internal and external dimensions and can also be used as a depth gauge. Vernier calipers are available with metric and imperial graduations.
Vernier calipers are used for more accurate measuring than can be achieved with a measuring rule or a slide caliper. It is capable of measuring internal and external dimensions and can also be used as a depth gauge. Vernier calipers are available with metric and imperial graduations.

1. External jaw
2. Intenal jaw
3. Sliding jaws
4. Metric Vernier scale
5. Locking screw
6. Main scale
7. Depth gauge

1. Measuring external dimensions
2. Measuring internal dimensions
3. Measuring depth dimensions
MEASURING WITH METRIC VERNIER CALIPER TO WITHIN 0,02mm
Each division on the main scale is 1mm.
The metric vernier scale is 49mm long and divided into 50 equal parts. Each division is 49/50, which is equal to 0,98mm. The difference between one division on the main scale and one division on the metric vernier scale is 1/50 or 0,02mm.

Read the measurement as shown above.
To read the measurement note the main scale measurement immediately preceding the zero line on vernier scale.
The zero of the vernier scale immediately preceding 28mm.
To this (28mm) must be added the decimal reading on the vernier scale. Note the line on the vernier scale which is coincident with a line on the main scale.
30th line concides with a line on the main scale.
So the reading is 28mm plus 30 divisions of 0,02mm
TOTAL: 28mm + 30 * 0,02 = 28,6mm
MEASURING WITH IMPERIAL VERNIER CALIPER TO WITHIN 0,001in
The main scale on the vernier is graduated and numbered in inches with each inch graduated and numbered in tenths (0,1in). Each tenth is divided into four giving 0,1in. divided by 4 = 0,025in. On the vernier scale 0,6in is divided into 25 parts. Each of these has a length of 0,6in divided by 25 = 0,024in. The difference in length between a small division on the main scale and the vernier scale is 0,025- 0,024 = 0,001in.

Read the measurement as shown above.
To read a measurement note the position of the zero line on the vernier scale in relation to the main scale. This is shown as 3,00in plus 0,300in plus 2*0,025in which equals 3,35in. To this must be added the number of divisions from the zero line on the vernier scale to the line which is coincident witha line on the main scale, in this case 15 divisions which equals 0,015in the total reading is therefore:
Main scale = 3,35in
Vernier scale = 0,015in
So the reading is 3,35in + 0,015 = 3,365in
The vernier caliper should not be used to measure the outside diameter of a cylinder having a radius greater than the depth of the caliper opening.

DIGITAL VERNIER CALIPERS
Digital vernier caliper is very accurate and does involve the computations needed by a standard vernier caliper. When the jaws come in contact with the workpiece, the measurement can be read directly from a digital display.
CARE OF CALIPERS:
1. Store calipers in separate containers provided.
2. Keep graduations and markings on all calipers clean and legible.
3. Do not drop any caliper. Small nicks or scratches can cause inaccurate measurements.
How to use and read a vernier caliper?
An ordinary vernier caliper has jaws you can place around an object, and on the other side jaws made to fit inside an object. These secondary jaws are for measuring the inside diameter of an object. Also, a stiff bar extends from the caliper as you open it that can be used to measure depth.
The basic steps are as follows:
1. Preparation to take the measurement, loosen the locking screw and move the slider to check if the vernier scale works properly. Before measuring, do make sure the caliper reads 0 when fully closed. If the reading is not 0, adjust the caliper’s jaws until you get a 0 reading. If you can’t adjust the caliper, you will have to remember to add to subtract the correct offset from your final reading. Clean the measuring surfaces of both vernier caliper and the object, then you can take the measurement.
2. Close the jaws lightly on the item which you want to measure. If you are measuring something round, be sure the axis of the part is perpendicular to the caliper. Namely, make sure you are measuring the full diameter. An ordinary caliper has jaws you can place around an object, and on the other side jaws made to fit inside an object. These secondary jaws are for measuring the inside diameter of an object. Also, a stiff bar extends from the caliper as you open it that can be used to measure depth.
3. How to read the measured value:
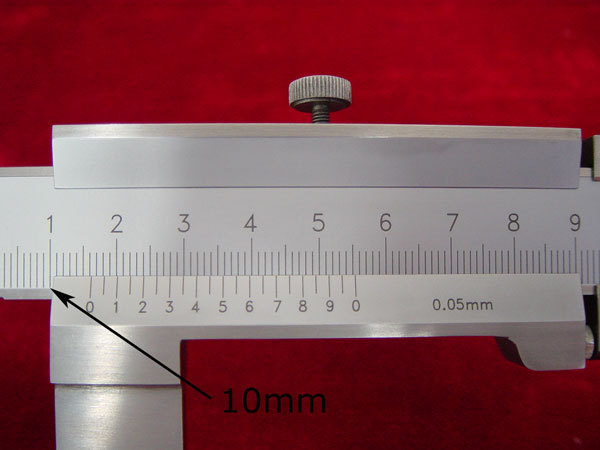
1), Read the centimeter mark on the fixed scale to the left of the 0-mark on the vernier scale. (10mm on the fixed caliper)

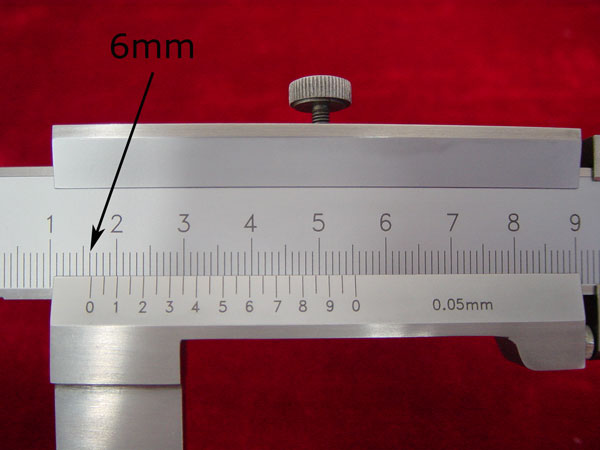
2). Find the millimeter mark on the fixed scale that is just to the left of the 0-mark on the vernier scale. (6mm on the fixed caliper)

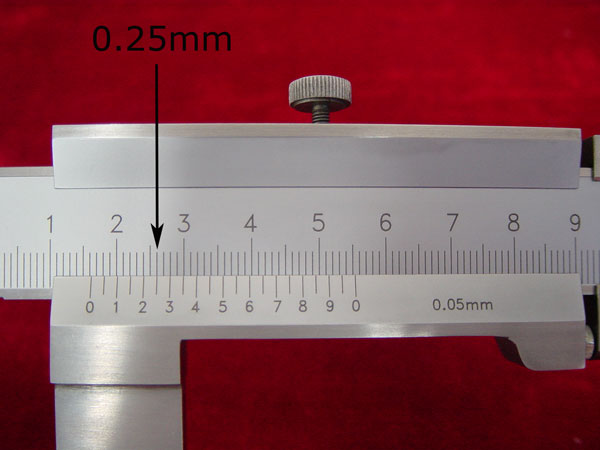
3). Look along the ten marks on the vernier scale and the millimeter marks on the adjacent fixed scale, until you find the two that most nearly line up. (0.25mm on the vernier scale)

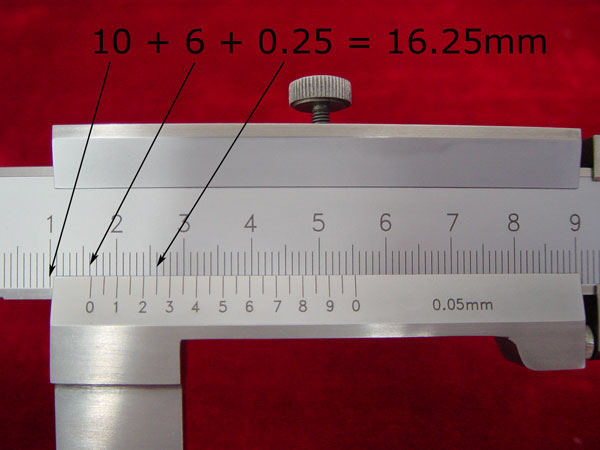
4). To get the correct reading, simply add this found digit to your previous reading. (10mm + 6mm + 0.25mm= 16.25 mm)

4.Maintenance
Clean the surface of the vernier caliper with dry and clean cloth (or soaked with cleaning oil) and stock in a dry environment if it stands idle for a long time

No comments:
Post a Comment