
To start fresh installation of xp professional perform the following steps
1. Insert the windows XP CD into your computer and restart your computer.
2. if prompted to start from the CD, press SPACE BAR if you miss the prompt
it only appears for a few second ), restart your computer to try again.
3. Windows XP setup begins, during this portion of setup, your mouse will not
work, so you must use the welcome to setup page,press ENTER. the following
figure shows the welcome to setup screen.

4. on the windows XP licensing agreement page, read the licensing agreement. press the PAGE DOWN key to scroll to the bottom of the agreement. then press F8.
5. pRess ENTER to select unpartitioned space, Which appears by default. this si Shown in the following figure :

6. Press ENTER again to select Format the partition using the NTFS file system, which appears by default.
this is shown in the following figure :

7. windows XP ereses your hard disk drive using a process called formatting and then copies the setup files. you can leave your computer and return in 20 to 30 minutes.this is as shown in the following figure :

8. Setup will now copy system files to the system / boot partition (s) you just created. this will allow the PC to boot from the C: drive and continue setup in GUI mode.
Eject the CD and reboot - from hard disk this time. the GUI setup starts
GUI - Based part of setup
The following are the steps that you should perform while continuing the GUI-based part of windows XP professional installation :
1. Click on the next button to accept the default settings for regional and language optional. the following figure shows the Regional and language optional page :

2. Enter your name and the name of your organization in the personalize Your software page as shown in following figure :

3. Enter the product key which comes with your installation CD in the your Product key page as shown in the following figure :

4. Enter a computer name and administer password in the computer name and administrator password page as shown in the following figure :

5. Enter the time setting

6. Network setup option as shown in the following figure :

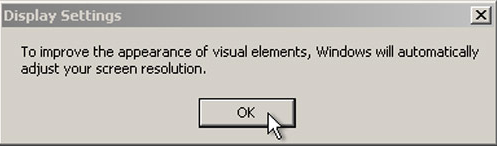
Windows XP will spend 20 or 30 minutes configuring your computer and will automatically restart when finished. when the display setting dialog appears, click OK. the display settings dialog box shown in the following figure :
Final installation Steps
The final setup begins. perform the following steps to complete the installation procedure of Windows XP professional :
1. On the welcome to Microsoft Windows page, click Next as shown in the following figure :

2. On the ready to register with Microsoft ? page , click Yes, and then Click Next , as Shown in the following figure :
3. On the Thank You page Click Finish.

1. Insert the windows XP CD into your computer and restart your computer.
2. if prompted to start from the CD, press SPACE BAR if you miss the prompt
it only appears for a few second ), restart your computer to try again.
3. Windows XP setup begins, during this portion of setup, your mouse will not
work, so you must use the welcome to setup page,press ENTER. the following
figure shows the welcome to setup screen.
4. on the windows XP licensing agreement page, read the licensing agreement. press the PAGE DOWN key to scroll to the bottom of the agreement. then press F8.
5. pRess ENTER to select unpartitioned space, Which appears by default. this si Shown in the following figure :
6. Press ENTER again to select Format the partition using the NTFS file system, which appears by default.
this is shown in the following figure :
7. windows XP ereses your hard disk drive using a process called formatting and then copies the setup files. you can leave your computer and return in 20 to 30 minutes.this is as shown in the following figure :
8. Setup will now copy system files to the system / boot partition (s) you just created. this will allow the PC to boot from the C: drive and continue setup in GUI mode.
Eject the CD and reboot - from hard disk this time. the GUI setup starts
GUI - Based part of setup
The following are the steps that you should perform while continuing the GUI-based part of windows XP professional installation :
1. Click on the next button to accept the default settings for regional and language optional. the following figure shows the Regional and language optional page :
2. Enter your name and the name of your organization in the personalize Your software page as shown in following figure :
3. Enter the product key which comes with your installation CD in the your Product key page as shown in the following figure :
4. Enter a computer name and administer password in the computer name and administrator password page as shown in the following figure :
5. Enter the time setting
6. Network setup option as shown in the following figure :
Windows XP will spend 20 or 30 minutes configuring your computer and will automatically restart when finished. when the display setting dialog appears, click OK. the display settings dialog box shown in the following figure :
Final installation Steps
The final setup begins. perform the following steps to complete the installation procedure of Windows XP professional :
1. On the welcome to Microsoft Windows page, click Next as shown in the following figure :
2. On the ready to register with Microsoft ? page , click Yes, and then Click Next , as Shown in the following figure :
3. On the Thank You page Click Finish.

No comments:
Post a Comment