Engineering Drawing:
An Engineering Drawing is a type of technical drawing, used to fully and clearly define requirements for engineered items, and is usually created in accordance with standardized conventions for layout.
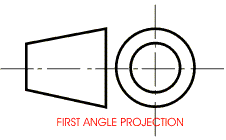
First Angle Projection:
1) The object is kept in the first quadrant.
2) The object lies between the observer and the plane of projection.
3) In this method, when the views are drawn in their relative positions, planed comes below the elevation.

Third Angle Projection:
1) The object is assumed to be kept in the third quadrant.
2) The Plane of Projection lies between the Observer and the Object.
3) In this method, when the views are drawn in their relative positions, the plan, comes above the elevation.
This example of third angel projection
 NT]
NT]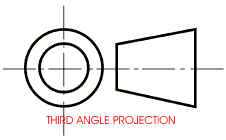
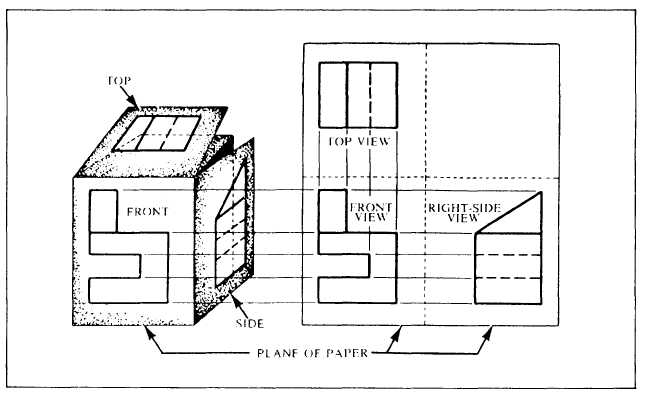
First Angle Projection :
>>> The object is located above HP(Horizontal Plane) and in front of VP(Vertical Plane).
>>> The object is in between Plane of Projection(POP) and Observer.
>>> In case of First angle Projection left hand side view is seen on the right hand side and the right hand side view is visible on the left hand side.
Third Angle Projection :
>>> The object is located below the Vertical Plane and behind the Horizontal Plane.
>>> The Plane of Projection in between Object and the Observer.
>>> But in case of Third angle Projection left hand side view is seen on the left hand side and the right hand side view is visible on the right hand side.It will be opposite of First angle Projection.
An Engineering Drawing is a type of technical drawing, used to fully and clearly define requirements for engineered items, and is usually created in accordance with standardized conventions for layout.
First Angle Projection:
1) The object is kept in the first quadrant.
2) The object lies between the observer and the plane of projection.
3) In this method, when the views are drawn in their relative positions, planed comes below the elevation.

Third Angle Projection:
1) The object is assumed to be kept in the third quadrant.
2) The Plane of Projection lies between the Observer and the Object.
3) In this method, when the views are drawn in their relative positions, the plan, comes above the elevation.
[FONT=arial, helvetica, clean, sans-serif]
[/FONT]
An Engineering Drawing is a type of technical drawing, used to fully and clearly define requirements for engineered items, and is usually created in accordance with standardized conventions for layout.
First Angle Projection:
1) The object is kept in the first quadrant.
2) The object lies between the observer and the plane of projection.
3) In this method, when the views are drawn in their relative positions, planed comes below the elevation.


Third Angle Projection:
1) The object is assumed to be kept in the third quadrant.
2) The Plane of Projection lies between the Observer and the Object.
3) In this method, when the views are drawn in their relative positions, the plan, comes above the elevation.
This example of third angel projection
 NT]
NT]
First Angle Projection :
>>> The object is located above HP(Horizontal Plane) and in front of VP(Vertical Plane).
>>> The object is in between Plane of Projection(POP) and Observer.
>>> In case of First angle Projection left hand side view is seen on the right hand side and the right hand side view is visible on the left hand side.
Third Angle Projection :
>>> The object is located below the Vertical Plane and behind the Horizontal Plane.
>>> The Plane of Projection in between Object and the Observer.
>>> But in case of Third angle Projection left hand side view is seen on the left hand side and the right hand side view is visible on the right hand side.It will be opposite of First angle Projection.
An Engineering Drawing is a type of technical drawing, used to fully and clearly define requirements for engineered items, and is usually created in accordance with standardized conventions for layout.
First Angle Projection:
1) The object is kept in the first quadrant.
2) The object lies between the observer and the plane of projection.
3) In this method, when the views are drawn in their relative positions, planed comes below the elevation.

Third Angle Projection:
1) The object is assumed to be kept in the third quadrant.
2) The Plane of Projection lies between the Observer and the Object.
3) In this method, when the views are drawn in their relative positions, the plan, comes above the elevation.
[FONT=arial, helvetica, clean, sans-serif]
[/FONT]

Re: What is Engineering drawing and explain first angle and third angle projection?
First Angle Projection :
>>> The object is located above HP(Horizontal Plane) and in front of VP(Vertical Plane).
>>> The object is in between Plane of Projection(POP) and Observer.
>>> In case of First angle Projection left hand side view is seen on the right hand side and the right hand side view is visible on the left hand side.
Third Angle Projection :
>>> The object is located below the Vertical Plane and behind the Horizontal Plane.
>>> The Plane of Projection in between Object and the Observer.
>>> But in case of Third angle Projection left hand side view is seen on the left hand side and the right hand side view is visible on the right hand side.It will be opposite of First angle Projection.
An Engineering Drawing is a type of technical drawing, used to fully and clearly define requirements for engineered items, and is usually created in accordance with standardized conventions for layout.
First Angle Projection:
1) The object is kept in the first quadrant.
2) The object lies between the observer and the plane of projection.
3) In this method, when the views are drawn in their relative positions, planed comes below the elevation.
Third Angle Projection:
1) The object is assumed to be kept in the third quadrant.
2) The Plane of Projection lies between the Observer and the Object.
3) In this method, when the views are drawn in their relative positions, the plan, comes above the elevation.
[FONT=arial, helvetica, clean, sans-serif]
[/FONT]

No comments:
Post a Comment